Due to a request by our beloved Keyable Blogspot reader, I write another feature of the Nemesis Service Suite (NSS) which enable end-user like us to change Nokia phones' product code.
All Nokia phones have a product code and printed on the white label inside the phone (mostly are 7 digits). These products codes are vary based to the region, language and color of the Nokia device. When you try to update your phone firmware, Nokia Software Updater will choose the appropriate firmware version for your phone based on the product code. So product code is very important, in order to have the correct languages and input languages available on your Nokia device.
Besides, firmware versions are vary to regions. Some regions might not get the latest firmware which has newer security or bug fix. You can simply change the product code to update the particular firmware.
To change product code, you need:
- Nemesis Service Suite (NSS)
- Data cable
Let's begin:
- Connect your phone to computer via data cable.
- Once PC suite/Ovi detected your phone, open Nemesis Service Suite (NSS).
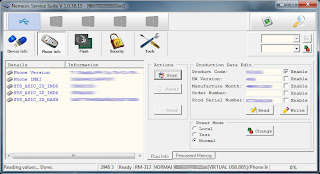
- Click Scan for new device (magnifier icon).
4. Click Phone Info.
5. Click Read and you will see your phone's Product Code. (Note it down if it's necessary)
6. Change the product code and tick Enable.
6. Change the product code and tick Enable.
7. Click Write.
8. When the status bar on bottom left corner shows done, NSS has successfully changed your phone's product code.
9. Done. You may click Read button again to confirm the product code is changed.
Proceed to update firmware with Nokia Suite. Nokia Suite will update the appropriate firmware based on the product code.


No comments:
Post a Comment
Tulis komentar disini..
Note: only a member of this blog may post a comment.